This guest post was written by Shea Daniels, Lead Software Engineer at Dwolla and user of Netlify CMS. It was originally published on the Dwolla blog.

Let’s say you’re building the next great startup or putting together a spectacular event—the first question anybody asks you is “What’s the website?”
A beautiful and usable online presence is simply table stakes in 2019 for businesses, nonprofits or even prospective employees—and it was no different for Monetery, the inclusive tech summit Dwolla puts on each spring. We needed to get a great site up and running fast, so we initially landed on a reliable and proven solution that we’ve used before: GitHub Pages.
This worked well early on as we launched the Monetery homepage, but it became clear that we needed a more complete solution. Because of our robust controls process, engineering was quickly becoming a roadblock. We needed to do a better job of enabling our content editors to move fast and make necessary changes quickly.
So we took a look at our options:
- Implement a traditional Content Management System (CMS) like WordPress</li>
- Find a Headless CMS to integrate into a Static Site Generator (SSG)</li>
The landscape of potential products for both of these options is monumental. We were familiar with traditional options, so we scoured headlesscms.org and staticgen.com to see what else was out there. Dwolla affords its engineering staff with dedicated time for professional development each week, which gave us an opportunity to test drive potential solutions.
One of the most interesting solutions we tried came from a company called Netlify, and their project Netlify CMS.
We thought Netlify CMS might benefit us for the following reasons:
- It’s built for use with Static Site Generators so we get to keep the speed, security and scalability benefits that drew us to SSGs in the first place
- It’s SSG agnostic, so it would work with our existing Jekyll site but not prevent us from changing our mind down the road (hi there, GatsbyJS!)
- There is no database backend since content changes are stored as Git commits - which makes InfoSec folks happy
- It provides a simple and usable editor experience
- It’s open source, so there is no vendor lock-in, and we can contribute features that are important to us back to the community
With buy-in from our stakeholders, we decided to move forward. We’ll talk about the decisions we had to make and show you how to integrate Netlify CMS with Jekyll on your own site.
Should you move from GitHub Pages to Netlify Hosting?
This was the first choice we needed to make. Switching seemed like it would add additional time and complexity to our project, and thus initially our decision was “no.” Using Netlify CMS with your existing hosting provider is a perfectly valid choice.
So why did we change our mind and move to Netlify hosting? The answer is that we found two features very compelling: Git Gateway and branch deploys.
Git Gateway works as an intermediary between the CMS and your Git repository. In concrete terms, this means you can do things like have your users log into the CMS admin with Google instead of requiring them to each have a GitHub account. Netlify then makes commits on your behalf using a GitHub account that granted access to a repo via OAuth. Although the Git Gateway is open source software as well, it was clear that learning to host that ourselves was going to involve a considerable learning curve.
Branch deploys give you the ability to have more than one version of your site live at a time. In comparison, GitHub Pages has a serious limitation in that only a single branch (usually master or gh-pages) can be deployed. This may not sound particularly exciting, but it enables a wonderful feature that we’ll get back to in a bit.
Migrating from GitHub Pages to Netlify
In general, publishing your site from Netlify is as easy as creating a Netlify account, signing in to your Git provider (GitHub, GitLab or Bitbucket) and selecting a repo. As soon as you provide a build command, Netlify can start deploying your site. Tasks like setting up SSL are explained by the Netlify Docs so we won’t cover that here.
If you were using the built-in Jekyll gems and build process that GitHub provided, you’ll need a few additional things to get the build working. You’ll need a Gemfile for your dependencies, and it’s also a good idea to check your build command into source control as well:
Once you’re satisfied that everything looks good and is deploying correctly from Netlify, you can proceed to claim your domain name on Netlify and migrate DNS over to Netlify’s name servers. After your DNS is fully cut over, you can safely turn off the GitHub Pages site from your repo.
Adding Netlify CMS to an Existing Site
Netlify CMS itself consists of a Single Page Application built with React that lives in an admin folder on your site. For Jekyll, it goes right at the root of your project. It will contain two files:
admin
 ├ index.html
 └ config.yml
The Netlify CMS Docs explain this better than we can:
The first file,
admin/index.html, is the entry point for the Netlify CMS admin interface. This means that users navigate toyoursite.com/admin/to access it. On the code side, it’s a basic HTML starter page that loads the Netlify CMS JavaScript file. In this example, we pull the file from a public CDN:
The second file,
admin/config.yml, is the heart of your Netlify CMS installation, and a bit more complex. The Configuration section covers the details.
To start with, the config file might look something like this:
The backend section covers the basics like which branch to update and sets up the Git Gateway connection that we talked about earlier. The publish_mode property sets up our workflow to use the editorial mode. In short, this means that we have the ability to save page drafts as pull requests in Git before we decide to publish them. Combined with the branch deploys feature of Netlify, this is going to give us live previews of unpublished content from a static site generator!
Note: as of May 2019, the editorial workflow is only supported when you use GitHub as a provider
Now we just need to drop in the Netlify Identity Widget on the main site. This is needed because after a user logs in they’ll be redirected to the homepage of the site. We need to redirect them back to the CMS admin, so add the following script before the closing body tag:
<script>
  if (window.netlifyIdentity) {
    window.netlifyIdentity.on("init", user => {
      if (!user) {
        window.netlifyIdentity.on("login", () => {
          document.location.href = "/admin/";
        });
      }
    });
  }
</script>
With this in place, and the appropriate authentication and Git Gateway configuration on netlify.com, you should be able to log into the Netlify CMS admin for your site at https://yourdomain.com/admin.
What are Collections?
Although at this point you can log in, you can’t do much yet! There is no data structure set up for the CMS fields you’ll need to edit your site. You may have noticed the empty collections field in the config file, and this is where the magic happens. All fields for data that you want to save need to be part of a collection.
There are two types of collections, folder collections and file collections. To understand the difference, let’s figure out what Netlify CMS actually does when you make a content edit: the data has to be stored somewhere and we know that it uses Git as a back end. That means the data you save must end up inside of a file in your project. So when we configure a collection, we are telling Netlify CMS about the structure and naming convention of the files we want to create. It’s then up to your static site generator to determine how to interpret these files and pull the data into templates. In this blog post, we’ll cover how that works for Jekyll.
Knowing this, can you guess why there are two types of collections? In the case of defined options, we can tell the CMS to put that field in a specific file in our project. In the case of repeating content, like blog posts or pages built out of modular components, we want to set up Netlify CMS so that it can generate many files based on a pattern that we define. We can generate a number of different file formats too - it supports YAML, JSON, markdown with front matter, and a few others.
Setting Up a File Collection for Global Options
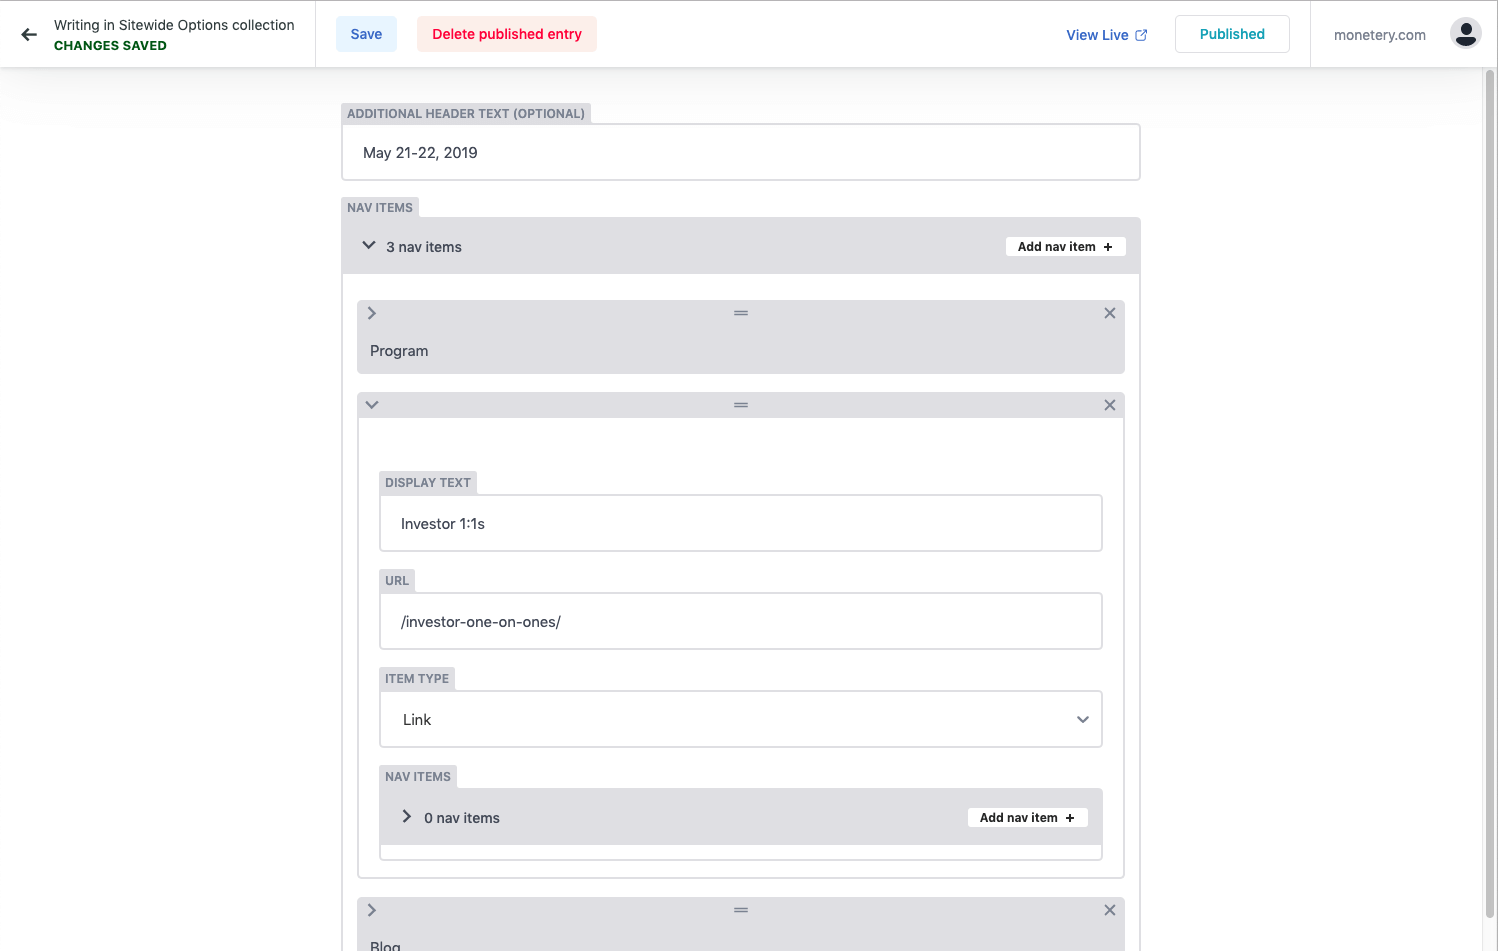
A file collection is the perfect place to define data fields for things that are valid across your entire site, such as global navigation, footers, and defaults. Let’s look at a file collection from a real config file:
This will define a new collection that shows up on left side of the CMS admin UI, and it will make a “Navigation Menu” page underneath that collection. Inside are fields that define some site navigation items that each include a name, URL, etc. We define the data type and editor interface of the fields using widgets. When a change is made, it will be saved to the file located at _data/nav.yml in your project.
Here’s an example of what the data file might look like:
How to Use a File Collection in Jekyll
Let’s figure out how to pull this data into a template in Jekyll. Here’s a simple liquid template that uses our nav data:
<ul>

</ul>
In Jekyll, everything in the _data folder is available using the site.data.{file}.{field} syntax. You can loop and get fields as you would expect.
Setting Up a Folder Collection for Pages
A folder collection is used any time we need a number of files to be generated according to a pattern, but we don’t know how many. For example, if you’re building a blog, this is what you need for your posts. In this example, we’ll use it with a cool Jekyll feature to let content editors create the pages of our site on the fly and at any path they want.
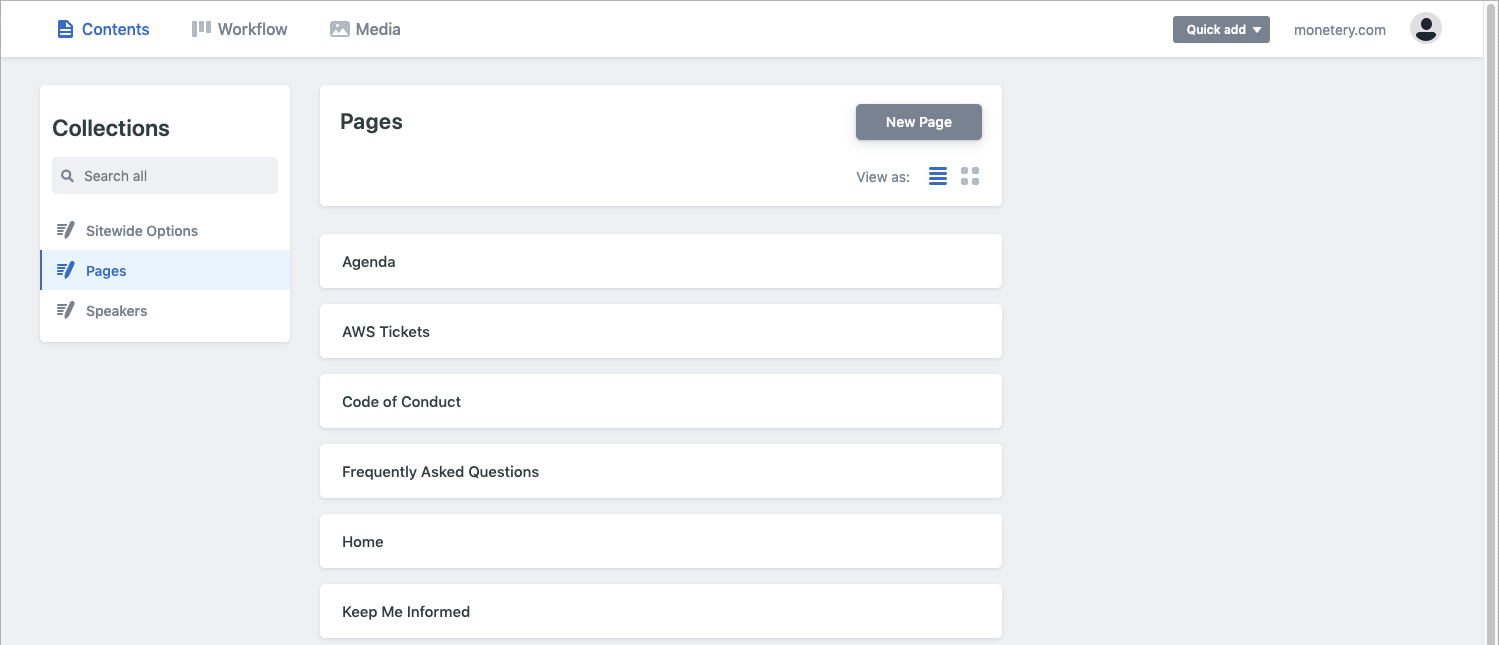
Let’s look at the bones of a folder collection from a real config file to see how this works:
This defines another new collection called “Pages” that will consist of many files all stored in the /_pages/ folder of your project. The files will be named according to the pattern in the slug field, which we’ve confusingly set to have a pattern of ``. Don’t worry, in this case it just means we’ll be using the default value, which is the contents of the title field. You can configure this in many ways to include dates and other things to match your intended use, but this is perfect for our case.
Of special note are the permalink and preview_path fields. We’ll use the permalink field to define the path of our page in Jekyll, and the preview field shares that definition with Netlify CMS so it knows how to link to the correct page preview (branch deploys FTW).
Here’s an example of what the data file for a page might look like:
How to Use a Folder Collection in Jekyll
If you were reading closely, you may have noticed that the file collection is generating YAML files, while the folder collection is generating markdown files with front matter. You might think that’s a bit odd to have a markdown file with no content below the data in the front matter (demarcated by the triple dashes), but rest assured there’s a good reason!
We’ll work in concert with Jekyll’s own collections feature to pair our markdown files with a template, read the data in the front matter and then use it to generate our page output. This lets us do neato things later like use the variable type list widget to make a component based page builder!
Before we start, we need to make an addition to the Jekyll config file:
This tells Jekyll to generate a new page for each markdown file in the pages folder.
But how does Jekyll know which template to use? In this case, the layout field we defined in Netlify CMS is doing exactly that. Jekyll maps the value in that front matter field directly to the name of a template file in the _layouts folder of your project.
Let’s look at an example layout template:
Implementing a Jekyll CMS in 3 Days
The image widget allows editors to upload an image or select an existing one from the media library. The path to the image file will be saved to the field as a string.
- Name:
image - UI: file picker button opens media gallery allowing image files (jpg, jpeg, webp, gif, png, bmp, tiff, svg) only; displays selected image thumbnail
- Data type: file path string
-
Options:
default: accepts a file path string; defaults to nullmedia_library: settings to apply when a media library is opened by the current widgetallow_multiple: (default:true) when set tofalse, multiple selection will be disabled even if the media library extension supports itconfig: a configuration object passed directly to the media library; check the documentation of your media library extension for availableconfigoptionsmedia_folder(Beta): file path where uploaded images will be saved specific to this control. Paths can be relative to a collection folder (e.g.imageswill add the image to a sub-folder in the collection folder) or absolute with reference to the base of the repo which needs to begin with/(e.g/static/imageswill save uploaded images to thestaticfolder in a sub folder namedimages)choose_url: (default:true) when set tofalse, the “Insert from URL” button will be hidden
- Example:
  - label: "Featured Image"
    name: "thumbnail"
    widget: "image"
    choose_url: true
    default: "/uploads/chocolate-dogecoin.jpg"
    media_library:
      config:
        multiple: true
All of the data we are interested in from the front matter is available using the {collection}.{field} syntax that Jekyll provides. We’re able to use parent templates and all of the other features as you’d expect.
Making a Page Builder in Jekyll
We’re off to a great start, but we didn’t need to go to all that trouble with our folder collection if we weren’t going to take it one step farther: let’s make a flexible, component-based page builder!
First, we need to define our components in the Netlify CMS config file:
Here we’ve extended our pages collection to include a variable type list widget that contains several different types of objects that the content editor will be able to dynamically add and rearrange from the CMS Admin.
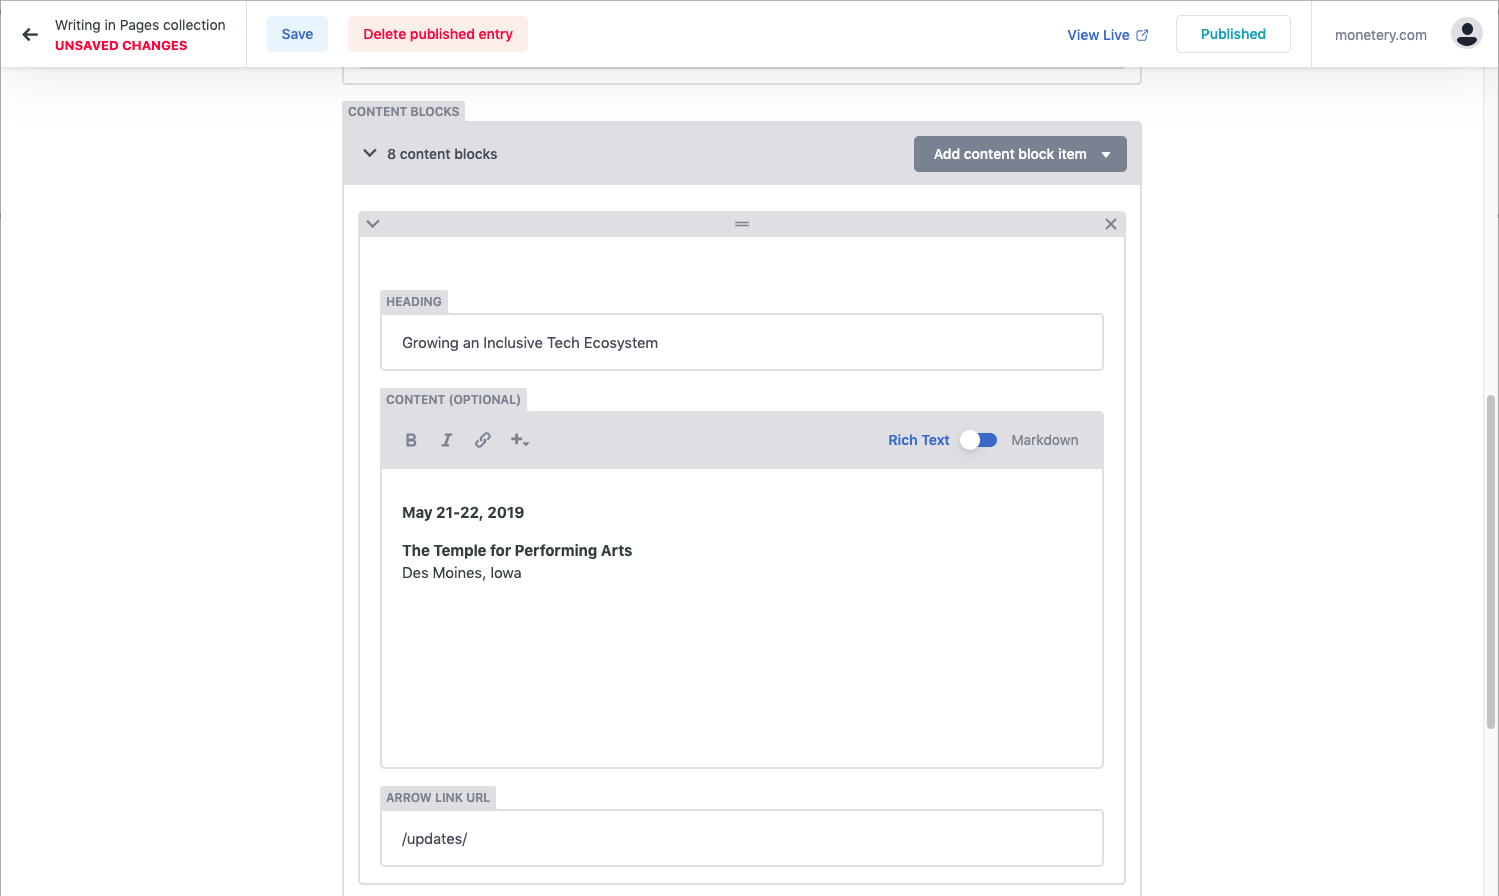
Now let’s make a new layout to render our widgets:
Here we’re looping through each component on the page, and including another template file that knows how to render it. Here’s what a component template might look like:
Because we passed along our block variable, everything is right where we need it. You’ll also notice we took special care to translate our markdown into HTML with markdownify since that isn’t being automatically done for us any more.
Our Experience with Netlify + Netlify CMS
Using these techniques, our engineers were able to integrate Netlify CMS into our existing Jekyll site for Monetery and launch a working CMS within a matter of days (three, to be exact). Content editors were able to onboard quickly and start publishing changes and new pages shortly after launch. During that time we also onboarded a new engineer who was able to start making meaningful contributions on their second day of work!
That said, we’re never done. We’re constantly learning from our experiences and trying to improve. Let’s take a balanced look at both the pros and cons of using Netlify + Netlify CMS:
Pros
- Hosting on Netlify is a breeze and we haven’t experienced any issues with the site itself
- Netlify CMS was very easy to retrofit onto an existing Jekyll project and intuitive for new engineers to learn
- It’s easy and very useful to get a copy of your entire project, including content, and run it locally using docker<
- The Netlify CMS interface is simple and easy to learn for content editors
- Branch deploys and previews are amazing
- Netlify’s free plans give you the freedom to evaluate the offering before committing
- There is an active and very helpful community chat for Netlify CMS
- Netlify CMS is open source and welcomes contributions
Cons
- Our content editors like the editorial workflow but don’t like the multiple steps to save and publish
- Saving and publishing is relatively slow, sometimes up to a few seconds
- We experience occasional—but frustrating—errors when using the CMS admin
- Some widgets or functionality that you might be looking for, such as conditional logic for displaying fields in the admin UI, hasn’t been implemented yet
- The CMS UI doesn’t work to save content to your machine during local development, it will always commit back to your Git repository, so be careful
- You are better off hosting with Netlify instead of another provider if you want features like branch deploys and a hosted Git Gateway - this may incur more cost to your business
The Community & Contributing Back
The Netlify CMS community has been nothing short of wonderful to interact with, so we encourage you to reach out and give this technology a try. Dwolla also believes in linking our words with our actions, so we’re committed to giving back to the open source community. We’re happy to report that our first pull request contributing to Netlify CMS is already live!
Check out the code on GitHub: https://github.com/netlify/netlify-cms